The Kratky Method: How Passive Hydroponics Actually Works
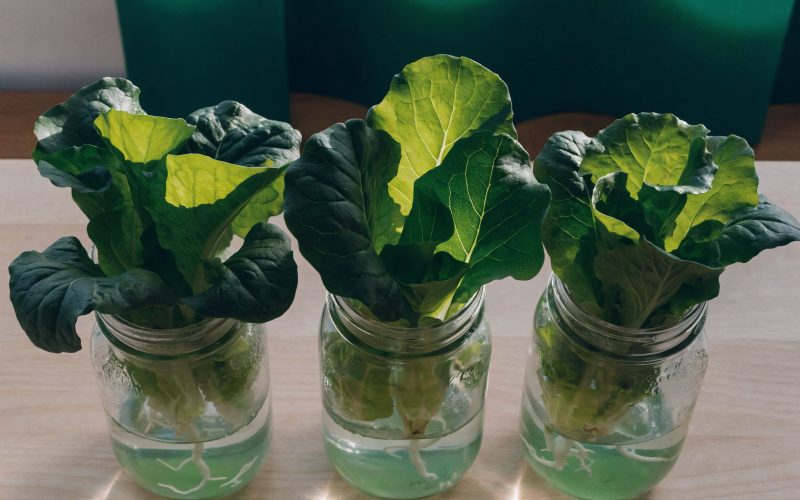
The Kratky method is the simplest hydroponic system that actually works. No pump. No electricity (beyond a grow light). No moving parts. Plants grow in a container of nutrient solution, and the system regulates itself as the solution level drops.
It was developed by Bernard Kratky at the University of Hawaii in the early 2000s, originally to grow lettuce in remote locations without reliable power infrastructure. The insight: if you suspend plant roots partly in nutrient solution and partly in air, the roots can absorb both nutrients and oxygen without any mechanical aeration. As the plant grows and consumes the solution, the air gap above the waterline grows, giving roots progressively more oxygen as the plant’s demand for it increases.
That is the entire system. Once you understand it, every other hydroponic system type becomes easier to reason about.
Why the Air Gap Is the Key Insight
In soil, oxygen reaches roots through pore spaces between soil particles. In a typical hydroponic system, an air pump and air stone dissolve oxygen directly into the solution. In Kratky, neither of these exists.
Instead, plant roots grow in two zones simultaneously:
Below the waterline: Roots absorb water and nutrients dissolved in the solution. These roots stay white and healthy in well-oxygenated solution.
Above the waterline (in the air gap): Roots that emerge above the solution level absorb atmospheric oxygen directly. These roots are slightly brown from exposure to air, which is normal and healthy.
The system self-adjusts because as the plant consumes solution, the waterline drops, the air gap grows, and more root surface is exposed to oxygen. This is why you do not top off to the original level once roots have established in the air gap; you would submerge the oxygen-absorbing roots and cause root rot.
What You Need
A complete Kratky setup for lettuce or herbs:
| Component | What to Get | Approximate Cost |
|---|---|---|
| Container | 5-gallon bucket, Mason jar, or opaque Rubbermaid tote | $3–$8 |
| Net pots | 2-inch net pots (1 per plant site) | $3–$5 for 10 |
| Growing medium | Clay pebbles (hydroton) or rockwool cubes | $5–$8 per liter |
| Nutrients | General hydroponics 3-part or MaxiGro | $10–$15 |
| pH meter | Bluelab Soil Pen or Apera PH60 | $20–$35 |
| pH Up/Down | GH pH Up and pH Down | $8–$12 |
| Grow light | T5 or LED bar light, 2,000–4,000 lux | $20–$40 |
Starting cost (first grow): $30–$50 if you don’t have a container or light, $10–$20 if you do.
The container must be opaque to block light from reaching the nutrient solution. Light causes algae blooms, which consume oxygen and compete with roots. Standard 5-gallon buckets are black. Mason jars need to be wrapped in aluminum foil or stored inside an opaque bag.
Step-by-Step Setup
1. Cut net pot holes in the container lid
For a 5-gallon bucket lid: cut a 2-inch hole centered. For a Rubbermaid tote: cut multiple 2-inch holes spaced 6–8 inches apart. Use a hole saw or a sharp utility knife. The net pot should sit flush with the lid with the basket extending down into the container.
2. Mix your nutrient solution
Fill the container with water. Measure EC (electrical conductivity); tap water typically starts at 0.2–0.4 mS/cm. Add nutrients according to label directions to reach your target EC:
- Seedlings / transplants: 0.8–1.2 mS/cm
- Established leafy greens: 1.2–2.0 mS/cm
Adjust pH to 5.8–6.2. This is non-negotiable. Outside this range, plants cannot absorb nutrients even if they are present in solution.
3. Fill to the correct level
Fill the container so the bottom of the net pot sits just at or slightly below the solution surface. The roots need initial contact with the solution to establish. Leave 1–2 inches of headspace above the solution and below the lid; this becomes the initial air gap.
4. Transplant your seedling
If starting from seedlings (recommended for beginners): place the root plug into the net pot, pack gently with clay pebbles to hold it upright, and lower into the lid hole. Roots should be in contact with solution immediately.
If starting from seed: start in a rockwool cube soaked in pH 5.5–6.0 water, germinate on a tray for 5–7 days until roots show, then transplant to the net pot when roots are 1–2 cm long.
5. Provide light
Leafy greens need 14–16 hours of light per day. A T5 fluorescent or LED bar hung 6–12 inches above the canopy is sufficient for lettuce and herbs. More light intensity (up to 20,000 lux) produces faster growth but is not required for a first successful crop.
6. Monitor and harvest
Check pH every 3–4 days. Check reservoir level weekly. Do not top off unless the plant shows signs of dehydration (wilting, slow growth). Harvest lettuce at 28–42 days from transplant by cutting outer leaves (cut-and-come-again method) or pulling the entire plant.
What to Grow in a Kratky System
Ideal Crops
- Lettuce (all varieties): 28–35 days from transplant to full head, EC 1.2–2.0, pH 5.8–6.2
- Basil: 30–40 days to usable size, benefits from pruning to encourage bushing
- Spinach: 30–40 days, prefers slightly cooler temperatures (60–70°F)
- Cilantro: 30–40 days, bolts quickly in warm conditions (keep under 70°F)
- Mint: vigorous grower, can outpace the reservoir; use a large container (3+ gallons)
- Kale and Swiss Chard: slower (45–60 days), but productive over multiple harvests
More Challenging (Possible but Not Ideal)
- Cherry tomatoes: need a 5-gallon minimum per plant, significant structural support, more frequent monitoring
- Peppers: similar to tomatoes; slow to establish and need high EC (2.0–3.0 mS/cm)
- Cucumbers: grow fast but need strong support and a very large reservoir
If this is your first hydroponic system, start with lettuce or basil. You’ll be harvesting in about a month with minimal intervention.
Common Problems and Fixes
Root rot (brown, slimy roots) Cause: Reservoir temperature above 72°F causing dissolved oxygen depletion, or air gap eliminated by topping off too high. Fix: Reduce reservoir temperature with insulation or frozen bottles; restore the air gap by not topping off until the level naturally drops.
pH crash Cause: Plants consuming nutrients faster than water causes pH drift downward. Common in warm temperatures. Fix: Check pH every 2 days; adjust with pH Up as needed. If pH is crashing daily, your EC may be too high, so dilute slightly.
Yellowing leaves (chlorosis) Cause: pH out of range preventing nutrient uptake, or nitrogen deficiency from low EC. Fix: Check pH first (most common cause). If pH is correct, check EC, and if it is below 0.8 mS/cm, add nutrients.
Algae in reservoir Cause: Light reaching the nutrient solution through container walls or around the lid. Fix: Wrap exposed surfaces with aluminum foil or black tape. Once algae establish, change the reservoir completely.
Leggy seedlings stretching toward light Cause: Light intensity too low or distance from plant canopy too great. Fix: Lower the light to 6–8 inches above the canopy, or increase wattage.
Scaling the Kratky Method
The same principles that work in a mason jar work in a 27-gallon Rubbermaid tote. Larger containers mean:
- Larger root systems per plant
- More solution volume to buffer pH swings
- Higher yield per square foot when multiple plants share one reservoir
- Less frequent monitoring (more total solution to buffer changes)
A 27-gallon tote with 8–12 plant sites can produce a full head of lettuce from each site on a continuous 28-day cycle. At full production, a single tote yields roughly one head of lettuce every 2–3 days.
To build a multi-site system: cut 2-inch holes across the tote lid at 6-inch intervals, fill to the correct level, and transplant staggered seedlings to harvest over a rolling schedule rather than all at once.
When to Upgrade to Deep Water Culture
Kratky is the right starting point for most growers. Upgrade to Deep Water Culture (DWC) when you want:
- Faster growth cycles (DWC plants grow 15–25% faster due to higher dissolved oxygen)
- The ability to grow fruiting crops at scale
- Experience with active systems before building more complex NFT or ebb-and-flow setups
DWC adds a pump, an air stone, and a small power requirement. The nutrient and pH management is identical. If you have understood the Kratky air gap principle, DWC will make immediate sense.
Next Steps
If you are ready to start, the Beginner Hydroponic System Guide covers Kratky alongside every other system type to help you confirm this is the right build for your space and goals. Once you have your container and net pots, the Nutrient Mixing Guide walks through exactly how to prepare your first reservoir.
The Kratky method produces food the first time almost everyone who builds it correctly. That is by design.
[ FAQ ]
Do I need a pump for the Kratky method?
No. That is the point. The Kratky method is passive hydroponics: no pump, no air stone, no timer, no electricity beyond a grow light. Plants suspend their roots in a shallow layer of nutrient solution. As the plant grows and consumes the solution, the level drops, creating an air gap above the waterline. Roots below the waterline absorb nutrients; roots in the air gap absorb oxygen. The system is self-regulating.
What plants grow best with the Kratky method?
Fast-cycling, leafy crops: lettuce (all varieties), basil, spinach, cilantro, mint, and arugula. These crops have modest nutrient demands, tolerate the slightly variable EC and pH that comes from a static reservoir, and complete their growth cycle before the solution is fully consumed. Fruiting plants like tomatoes and peppers can grow in Kratky systems with large enough reservoirs (5+ gallons per plant), but require more monitoring and are better suited to DWC.
How often do I need to check a Kratky system?
For lettuce and leafy greens: check pH and reservoir level every 3–4 days. pH should stay between 5.8 and 6.2. If the solution level drops below about 1 inch, the roots in the air gap may dry out before the plant finishes growing; this is the primary failure mode after the grow is underway. You do not need to top off unless the plant is clearly struggling, because topping off too high reduces the air gap.
Can I top off the nutrient solution in a Kratky system?
Yes, but carefully. Add nutrient solution (at the same concentration as your original mix) to bring the level back up, but leave at least a 1-inch air gap above the waterline at all times. Topping off with plain water dilutes the nutrients and will cause deficiency over time. The cleanest approach: mix a fresh batch at your target EC and top off to restore the air gap to 1–2 inches.
How does Kratky compare to DWC (Deep Water Culture)?
Kratky is passive: no pump, no electricity, lower maintenance, lower cost. DWC uses an air pump and air stone to continuously oxygenate the solution, which supports higher nutrient concentration and faster growth. DWC plants typically reach harvest 15–25% faster than Kratky plants for the same variety. The trade-off: DWC requires a pump ($8–$15), a power outlet, and monitoring that the pump does not fail. For a first system, Kratky is the right choice. Once you understand nutrient management and pH, DWC is the natural upgrade.
Related Articles
Deep Water Culture (DWC): Build It, Run It, Harvest It
A complete guide to deep water culture hydroponics: how it works, a $25–50 single-bucket build, EC and pH management, crop targets, and RDWC upgrades.